Android Wear Demand
By Michael Hahn, April 2017
The Demand context is one of the core functions for Android Wear. A demand is displayed as a large icon, typically when you swipe a displayed suggestion (notification). You tap on an icon to perform the desired demand.
When new email arrives for example, you swipe to the left to scroll through the demand icons, such as open, reply, and archive. You can create custom icons for your app as well. This section explains how to code your own wearable demand that handles a voice reply.
First Android Wear Demand
If you have not already done so, Create an Android Studio Project. The new project wizard in Android Studio creates a project with two main activities, one for the handheld device and another for the wearable. To create your first demand, add code in the handheld activity only, which is located in the “mobile” branch of the project hierarchy. The wearable operating system handles the task of presenting a notification to the user and returning any demand to the handheld.
The demand process on a wearable begins when the handheld activity creates a notification that includes an action (demand). When a user views the notification on the handheld and invokes the demand, the wearable broadcasts the users demand to the handheld for processing.
The handheld code you write consists of two parts, one that sends a notification to the wearable and another that receives the receives the returned demand.
Create a Broadcast Receiver to Receive Demands from the User
When the wearable user makes a demand, the wearable broadcasts it back to the handheld. The following example shows how to receive the demand in the handheld.
- Add a BroadcastReceiver class to the project. In Android Studio, select Add from the File menu and choose Java Class. Name the class DemandEntentReceiver , set the Supercalass to BroadcastReceiver. paste in the following code.
public class DemandIntentReceiver extends BroadcastReceiver{

  public static final String ACTION_DEMAND = "com.androidweardocs.ACTION_DEMAND";
  public static final String EXTRA_MESSAGE = "com.androidweardocs.EXTRA_MESSAGE";
  public static final String EXTRA_VOICE_REPLY = "com.androidweardocs.EXTRA_VOICE_REPLY";

  @Override
  public void onReceive(Context context, Intent intent) {

 if (intent.getAction().equals(this.ACTION_DEMAND)) {
    String message = intent.getStringExtra(this.EXTRA_MESSAGE);
    Log.v("MyTag","Extra message from intent = " + message);
    Bundle remoteInput = RemoteInput.getResultsFromIntent(intent);
    CharSequence reply = remoteInput.getCharSequence(this.EXTRA_VOICE_REPLY);
    Log.v("MyTag", "User reply from wearable: " + reply);


    // Optional, broadcast demand string to handheld activity for display onscreen.
    //
    String replyString = reply.toString();
    Intent messageIntent = new Intent();
    messageIntent.setAction(Intent.ACTION_SEND);
    messageIntent.putExtra("reply", replyString);
    LocalBroadcastManager.getInstance(context).sendBroadcast(messageIntent);
      }
    }
  }
- Modify the manifest (AndroidManifest.xml) to accept a broadcast from the wearable. Add the following receiver section within the application section.
<receiver android:name=".DemandIntentReceiver" android:exported="false">
  <intent-filter>
    <action android:name="com.androidweardocs.first_wearable.ACTION_DEMAND"/>
  </intent-filter>
</receiver>
Create a Notification that Includes a Demand Prompt
You build the notification with a hierarchy of objects, intent -> pending intent -> notification action -> wearable extender, and finally the notification itself. Add all the code in this section to the onCreate method of the handheld activity.
- Create an intent.
Intent demandIntent = new Intent(this, DemandIntentReceiver.class)
   .putExtra(DemandIntentReceiver.EXTRA_MESSAGE, "Reply icon selected.")
   .setAction(ACTION_DEMAND);
- Create a PendingIntent to include in the notification.
A PendingIntent wraps the intent to grant the privileges it needs to execute in your application. It contains the context of the activity, service, or broadcast receiver that will receive the demand, and the Intent object itself.
This example creates a PendingIntent using the context of a broadcast receiver. You can use getActivity instead of getBroadcast if your activity receives demands.
PendingIntent demandPendingIntent =
    PendingIntent.getBroadcast(this, 0, demandIntent, 0);
- Create a RemoteInput object to hold a voice reply from the wearable device. A voice request or response is a common action for a wearable device because of the small size of the UI.
String replyLabel = getResources().getString(R.string.app_name);
RemoteInput remoteInput = new RemoteInput.Builder(EXTRA_VOICE_REPLY)
  .setLabel(replyLabel)
  .build();
- Create a wearable action.
The following example creates a wearable action, adds the pending intent, and the RemoteInput object for voice. The ic_reply_icon is a graphic copied from the SDK to the handheld drawable folder.
NotificationCompat.Action replyAction =
  new NotificationCompat.Action.Builder(R.drawable.ic_reply_icon,
    "Reply", demandPendingIntent)
    .addRemoteInput(remoteInput)
    .build();
- Create a WearableExtender for the a notification and add the wearable action.
NotificationCompat.WearableExtender wearableExtender =
  new NotificationCompat.WearableExtender()
      .addAction(replyAction);
Dispatch the Notification
- Create a notification and extended it with the wearable extender just created. The following example creates a notification that includes a reply action (demand). The ic_launcher is located in the mipmap folder; copy it to the drawable folder.
Notification notification =
  new NotificationCompat.Builder(this)
    .setContentTitle("Hello Wearable!")
    .setContentText("First Wearable demand.")
    .setSmallIcon(R.drawable.ic_launcher)
    .extend(wearableExtender)
    .build();
- Get an instance of the Notification Manager service.
NotificationManagerCompat notificationManager =
  NotificationManagerCompat.from(this);
- Dispatch the extended notification.
This notification is displayed in the wearable demand notifications. When the user selects this notification, scrolls to the right, selects the demand icon, and speaks the demand, the demand text is broadcast back to the handheld.
int notificationId = 1;
notificationManager.notify(notificationId, notification);
Process User Demands
User demands are received in the onReceive method of the broadcast receiver previously defined. They can be parsed and processed according to the application needs.
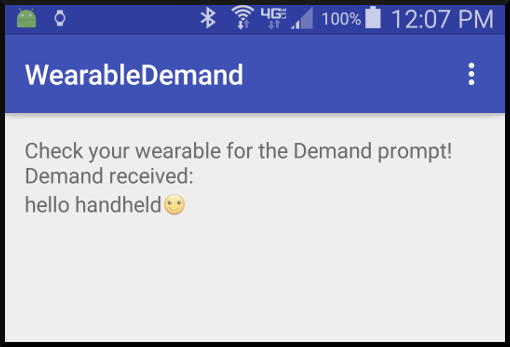
For this example the user demands are simply displayed on the handheld screen. The class that receives the demand cannot directly display the demand text onscreen because the handheld operates in a different context. A simple way to handle this is to broadcast a local message to the handheld app that contains the demand text.
Add an ID to the Handheld TextView
Open the layout file for the handheld display (activity_handheld.xml) and set the id of the text view to demand_text. At the same time you can change the default text to a user prompt, as follows.
  <TextView
android:layout_width="wrap_content"
android:layout_height="wrap_content"
android:id="@+id/demand_text"
android:text="Check your wearable for the demand prompt"
... />
Define a Local Broadcast Receiver
Define a nested BroadcastReceiver class within the HandheldReceiver class that can receive the wearable demand forwarded from the DemandIntentReceiver. This class extracts the demand contained in the message and displays it on the handheld display.
public class MessageReceiver extends BroadcastReceiver {

  @Override
  public void onReceive(Context context, Intent intent) {

    // Display the received demand
    TextView demandView = (TextView) findViewById(R.id.demand_text);
    String demand = demandView.getText() + intent.getStringExtra("reply");
    demandView.setText(demand);
  }
}
Forward Received Demands to a Local Broadcast
The example BroadcastReceiver class already has the necessary code to forward received demands. See Create a Broadcast Receiver to Receive Demands from the User.
Receive and Display the Wearable Demand
Create an instance of the local message receiver in the handheld code and register it to receive messages.
IntentFilter messageFilter = new IntentFilter(Intent.ACTION_SEND);
MessageReceiver messageReceiver = new MessageReceiver();
LocalBroadcastManager.getInstance(this).
  registerReceiver(messageReceiver, messageFilter);
Try the First Demand
Your new app creates and dispatches a notification that includes a demand when it first opens. Both the handheld and wearable receive and post this notification. The wearable adds it to the notification stream, so scroll through the notifications until you see the demand.
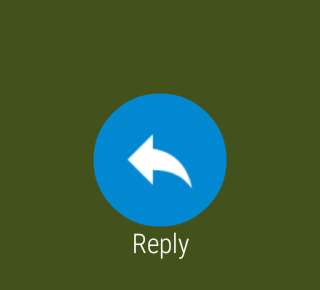
Swipe up on the demand notification to place it in full view, then swipe to the left. The Reply icon is displayed.
Tap the reply icon to display the voice demand or emoticon. Voice is the default, so just start speaking to enter a voice demand.

In this example the voice demand is hello handheld. Android converts your voice input to text and begins sending it to the handheld. You can abort this by taping the blue Sending icon. When Android finishes sending the demand to the handheld, it returns to the Reply prompt. You could then, for example, tap Reply and then Draw Emoji.
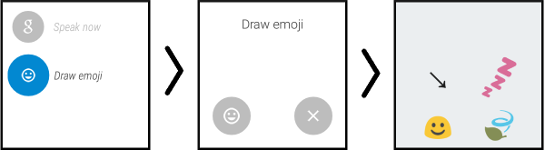
In the first prompt you can draw the emoji you want or just click the emoji icon. Either way you get a grid of emoji icons to choose from. Tap the desired emoji and Android sends it to the handheld.
Note: The emoji functionality is all implemented by the Android system software.
Example
The full Android Studio project for demands is posted at https://github.com/LarkspurCA/WearableDemand.